CoordinatorLayout被称为联动布局,这是Design Support Library中最重要与最难的部分。
首先我们要把CoordinatorLayout作为根布局,导入下面的依赖
compile ‘com.android.support:design:26.1.0’
1.有时候我们会看到一个底部有一个块,然后可以拖上来成为一个布局,类似于下面这种
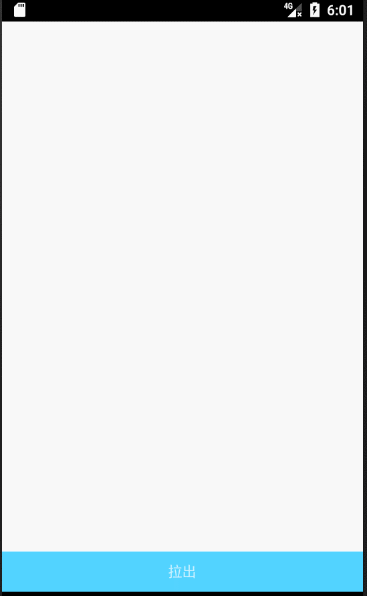
要使用这种效果只要两个代码,第一个是设置露出的高度,第二个一定要这么写,然后你就可以拖动将布局拖出来了
1 | ... |
想要改变脱出后头部的样式和布局,那么你就需要再代码里面设置了1
2
3
4
5
6
7
8
9
10
11
12
13
14
15
16
17
18
19
20
21
22
23
24
25
26
27
28
29
30
31
32
33
34
35
36
37
38
39private RelativeLayout rsb;
private TextView text,text1;
private BottomSheetBehavior behavior;
protected void onCreate(@Nullable Bundle savedInstanceState) {
super.onCreate(savedInstanceState);
setContentView(R.layout.layout);
/**根布局**/
rsb=findViewById(R.id.rsb);
text=findViewById(R.id.text);
text1=findViewById(R.id.text1);
behavior= BottomSheetBehavior.from(rsb);
behavior.setBottomSheetCallback(new BottomSheetBehavior.BottomSheetCallback() {
public void onStateChanged(@NonNull View bottomSheet, int newState) {
/**滑动结束回调方法,BottomSheetBehavior状态的改变*/
if(newState==BottomSheetBehavior.STATE_EXPANDED){
/**当结束后是滑动出来的**/
text1.setVisibility(View.VISIBLE);
}else if(newState==BottomSheetBehavior.STATE_COLLAPSED){
/**当结束后是收缩进去的**/
text.setVisibility(View.VISIBLE);
bottomSheet.setAlpha(1f);
}
}
public void onSlide(@NonNull View bottomSheet, float slideOffset) {
/**滑动回调方法,slideOffset是所占高度的比例,可以用这个来做一些动画*/
bottomSheet.setAlpha(slideOffset);
if(text1.getVisibility()==View.GONE){
/**滑动开始如果 点击收缩 按钮为隐藏**/
text.setVisibility(View.GONE);
}else{
/**滑动开始如果 点击收缩 按钮为显示**/
text1.setVisibility(View.GONE);
}
}
});
}
下面放出布局代码1
2
3
4
5
6
7
8
9
10
11
12
13
14
15
16
17
18
19
20
21
22
23
24
25
26
27
28
29
30
31
32
33
34
35<?xml version="1.0" encoding="utf-8"?>
<android.support.design.widget.CoordinatorLayout xmlns:android="http://schemas.android.com/apk/res/android"
android:layout_width="match_parent"
android:layout_height="match_parent"
android:id="@+id/coordinator"
android:background="#ffffff"
xmlns:app="http://schemas.android.com/apk/res-auto">
<RelativeLayout
android:id="@+id/rsb"
app:behavior_peekHeight="40dp"
app:layout_behavior="@string/bottom_sheet_behavior"
android:layout_width="match_parent"
android:layout_height="match_parent">
<TextView
android:id="@+id/text"
android:text="拉出"
android:background="#52D3FF"
android:gravity="center"
android:layout_width="match_parent"
android:layout_height="40dp" />
<TextView
android:id="@+id/text1"
android:text="点击收缩"
android:gravity="center"
android:background="#52D3FF"
android:visibility="gone"
android:layout_width="match_parent"
android:layout_height="40dp" />
<RelativeLayout
android:background="#ff0000"
android:layout_marginTop="40dp"
android:layout_width="match_parent"
android:layout_height="match_parent"></RelativeLayout>
</RelativeLayout>
</android.support.design.widget.CoordinatorLayout>
2.看gif
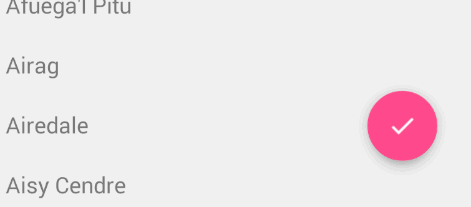
想要实现这种效果也很简单,将
FloatingActionButton放在CoordinatorLayout里面,代码中将CoordinatorLayout传给Snackbar就行了1 | ... |
3.AppBarLayout子View的动作
内部的子View通过在布局中加app:layout_scrollFlags设置执行的动作,那么app:layout_scrollFlags可以设置哪些动作呢?分别如下:
(1) scroll:值设为scroll的View会跟随滚动事件一起发生移动。
(2) enterAlways:值设为enterAlways的View,当ScrollView往下滚动时,该View会直接往下滚动。而不用考虑ScrollView是否在滚动。
(3) exitUntilCollapsed:值设为exitUntilCollapsed的View,当这个View要往上逐渐“消逝”时,会一直往上滑动,直到剩下的的高度达到它的最小高度后,再响应ScrollView的内部滑动事件。
(4) enterAlwaysCollapsed:是enterAlways的附加选项,一般跟enterAlways一起使用,它是指,View在往下“出现”的时候,首先是enterAlways效果,当View的高度达到最小高度时,View就暂时不去往下滚动,直到ScrollView滑动到顶部不再滑动时,View再继续往下滑动,直到滑到View的顶部结束。
2
3
4
5
6
7
8
9
10
11
12
13
14
15
16
17
18
19
20
21
android:background="#ff0000"
android:layout_width="match_parent"
android:layout_height="200dp">
<android.support.v7.widget.Toolbar
app:title="标题"
app:layout_scrollFlags="scroll|enterAlwaysCollapsed|enterAlways" //改这里就行了,混合使用
android:layout_width="match_parent"
android:minHeight="50dp"
android:gravity="bottom"
android:layout_height="match_parent">
</android.support.v7.widget.Toolbar>
</android.support.design.widget.AppBarLayout>
<android.support.v7.widget.RecyclerView
android:id="@+id/recyle"
app:layout_behavior="@string/appbar_scrolling_view_behavior"
android:layout_width="match_parent"
android:layout_height="match_parent">
</android.support.v7.widget.RecyclerView>
4.实现下面这种效果
1 | <android.support.design.widget.CoordinatorLayout xmlns:android="http://schemas.android.com/apk/res/android" |
监听事件,
1 | public abstract class AppBarStateChangeListener implements AppBarLayout.OnOffsetChangedListener { |
如果你希望拖动过程中状态栏是透明的,可以在CollapsingToolbarLayout中加 app:statusBarScrim=”@android:color/transparent”,并且在onCreate中调用getWindow().addFlags(WindowManager.LayoutParams.FLAG_TRANSLUCENT_STATUS)将状态栏设置为透明就好啦~

